背景
上一节,我们通过使用docker 命令以及进入容器内安装命令等,安装和运行了centos8和ssh。你会发现,我们的任何操作和修改都需要进入容器内部。
这时候,dockerfiled就派上用场了。我们只需要创建一个dockerfile文件,任何改动和更新只需要编辑dockerfile即可。
如果你是docker初学者,强烈建议先去阅读和操作前一篇mac系统docker运行centos8-ssh。然后再回来阅读和操作本篇,就会清晰的知道 看到 dockerfile的优点和益处。对dockerfile的作用有更深入和更清晰的理解。
系统
MacOS Monterey 12.7.1 芯片:intel
为了完整的展示从0到1的整个过程,会一步一步的把遇到的问题真实的体现出来。如果想直接去看完整dockerfile,去附录即可。

制作dockerfile
创建和编辑dockerfile
- $ cd /Users/{user}/test-docker/test-docker-file
- touch Dockerfile
- chmod +x Dockerfile
编辑内容,添加以下1
2
3
4
5
6
7
8
9
10
11
12
13
14## test
## 默认是centos:latest
FROM centos
LABEL org.opencontainers.image.authors="xxx@gmail.com"
RUN yum update -y \
&& yum install -y openssh-server \
&& echo 'root:yourpassword' |chpasswd \
EXPOSE 22
CMD ["/usr/sbin/sshd","-D"]
如果对dockerfile指令不熟悉,可以参见dockerfile指令详解
脚本很简单,引用centos latest,使用yum安装ssh,给容器root用户设置密码,暴露22端口,定义容器启动时第一个执行的程序(命令)。
dockerfile制作完了,然后就是构建这个脚本了。
构建
我们给新镜像定义name:test-ssh-from-docker-file
- $ docker build -t test-ssh-from-docker-file .
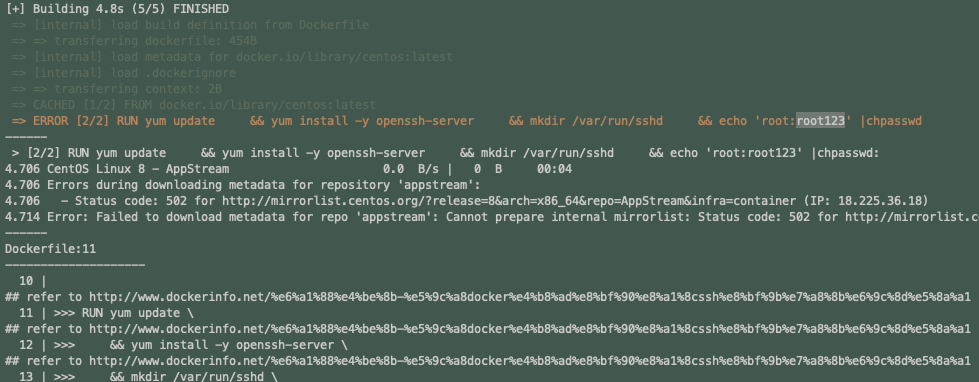
执行后发现报错了,如下1
2
3
4
5
6
7
8
9
10
11
12
13
14
15
16
17
18
19
20
21
22
23
24[+] Building 4.8s (5/5) FINISHED
=> [internal] load build definition from Dockerfile
=> => transferring dockerfile: 454B
=> [internal] load metadata for docker.io/library/centos:latest
=> [internal] load .dockerignore
=> => transferring context: 2B
=> CACHED [1/2] FROM docker.io/library/centos:latest
=> ERROR [2/2] RUN yum update && yum install -y openssh-server && mkdir /var/run/sshd && echo 'root:root123' |chpasswd
------
> [2/2] RUN yum update && yum install -y openssh-server && mkdir /var/run/sshd && echo 'root:root123' |chpasswd:
4.706 CentOS Linux 8 - AppStream 0.0 B/s | 0 B
4.706 Errors during downloading metadata for repository 'appstream':
4.706 - Status code: 502 for http://mirrorlist.centos.org/?release=8&arch=x86_64&repo=AppStream&infra=container (IP: 18.225.36.18)
4.714 Error: Failed to download metadata for repo 'appstream': Cannot prepare internal mirrorlist: Status code: 502 for http://mirrorlist.centos.org/?release=8&arch=x86_64&repo=AppStream&infra=container (IP: 18.225.36.18)
------
Dockerfile:11
--------------------
10 |
## refer to http://www.dockerinfo.net/%e6%a1%88%e4%be%8b-%e5%9c%a8docker%e4%b8%ad%e8%bf%90%e8%a1%8cssh%e8%bf%9b%e7%a8%8b%e6%9c%8d%e5%8a%a1
11 | >>> RUN yum update \
## refer to http://www.dockerinfo.net/%e6%a1%88%e4%be%8b-%e5%9c%a8docker%e4%b8%ad%e8%bf%90%e8%a1%8cssh%e8%bf%9b%e7%a8%8b%e6%9c%8d%e5%8a%a1
12 | >>> && yum install -y openssh-server \
## refer to http://www.dockerinfo.net/%e6%a1%88%e4%be%8b-%e5%9c%a8docker%e4%b8%ad%e8%bf%90%e8%a1%8cssh%e8%bf%9b%e7%a8%8b%e6%9c%8d%e5%8a%a1
13 | >>> && mkdir /var/run/sshd \

原因:大概意思是mirrorlist不提供维护了,需要将mirrorlist改为baseurl;同时需要将baseurl的地址mirror.centos.org 改为 vault.centos.org。
所以,解决方案(参考:mirrorlist-centos-org-no-longer-resolve)时脚本中添加如下命令用以更新地址。
1 | sed -i s/mirror.centos.org/vault.centos.org/g /etc/yum.repos.d/CentOS-*.repo \ |
再次构建 docker build -t test-ssh-from-docker-file .。
构建没有报错。

docker容器运行镜像
这时,我们可以启动这个镜像了
- $ docker run -d –privileged -p 5007:22 –name test-ssh-from-docker-file-container test-ssh-from-docker-file
查看实例
- docker container ls -a
发现容器状态是Exited,正常是Running。
看来是构建成功了,但是容器内执行指令时有错误。这时,就需要看看容器的日志了。
查看docker容器日志
查看docker容器日志有两种方式。一种是进入容器中(docker exec)(问题:但如果容器没有启动,无法进入)。一种是通过docker logs。
- $ docker logs test-ssh-from-docker-file-container
运行这个命令,就可以看到这个容器的日志1
2
3
4Unable to load host key: /etc/ssh/ssh_host_rsa_key
Unable to load host key: /etc/ssh/ssh_host_ecdsa_key
Unable to load host key: /etc/ssh/ssh_host_ed25519_key
sshd: no hostkeys available -- exiting.
错误的原因是没有生成对应的ssh key。解决方案(参考:ssh-could-not-load-host-key)是dockerfile中增加如下1
/usr/bin/ssh-keygen -A
我们再次构建 docker build -t test-ssh-from-docker-file .。但之前已经生成对应的镜像了(虽然它没运行起来)。需要使用 docker rm container test-ssh-from-docker-file-container 删除镜像实例,docker image rm test-ssh-from-docker-file 删除镜像。
再次构建,没有报错信息;再次运行镜像,查看 docker logs,没有错误日志。执行 docker container ls 发现 test-ssh-from-docker-file-container 的状态是Running了。

此时,容器是创建和运行成功了。
我们就可以进入容器内部了。
进入容器内部
- $ docker exec -it test-ssh-from-docker-file-container bash
执行命令后就进入centos8容器内了。这时,可以执行命令,如查看容器的进程 ps -ef。

客户端通过ssh连接容器
我们新打开一个终端窗口,可以通过 docker port 查看容器内部端口对外暴露端口docker port test-ssh-from-docker-file-container 22。
然后执行ssh命令
- $ ssh root@localhost -p 5007
1 | The authenticity of host '[localhost]:5007 ([::1]:5007)' can't be established. |
可以看到,连接成功了。
如果想停止容器实例,可以执行 docker stop test-ssh-from-docker-file-container
此时,我们已经通过Dockerfile制作了 test-ssh-from-docker-file 镜像和成功运行了镜像实例 test-ssh-from-docker-file-container
我们只需要将这个做好的镜像push到docker hub即可。
推送镜像到docker hub
- $ docker push test-ssh-from-docker-file
报错了,提示没有权限1
2
3
4The push refers to repository [docker.io/library/test-ssh-from-docker-file]
f6e6bced2702: Preparing
74ddd0ec08fa: Preparing
denied: requested access to the resource is denied
- $ docker image ls
查看镜像1
2REPOSITORY TAG IMAGE ID CREATED SIZE
test-ssh-from-docker-file v1 b3fd18bb5d2d 24 minutes ago 302MB
解决方案:我们重新tag下,将镜像加上你的docker hub的用户名。如yourUserName=test123
- $ docker tag test-ssh-from-docker-file test123/test-ssh-from-docker-file
再次push到docker hub
- $ docker push test123/test-ssh-from-docker-file
1
2
3
4The push refers to repository [docker.io/{yourUserName}/test-ssh-from-docker-file]
f6e6bced2702: Pushed
74ddd0ec08fa: Pushed
v1: digest: sha256:123ed4e883cecef8180433b3a21d11b1e383d9da68bac01694b1c84575e3e72b size: 333
成功了。
我们通过docker desktop也可以看到hub上的镜像,如图


附录
docker run 参数说明
说明1
2
3
4
5
6- $ docker run -d --privileged -p 5007:22 --name test-ssh-from-docker-file-container test-ssh-from-docker-file
-d:后台运行
-p:指定外部端口映射容器内部的端口
-P:随机一个外部端口映射容器内部的端口,优先使用dockerfile中EXPOSE指定的
--privileged:特权模式,相当于管理员权限
参考
Could not retrieve mirrorlist的解决方法
完整的dockerfile
1 | ## test |
dockerfile制作与运行docker镜像-模版
制作dockerfile
创建和编辑dockerfile1
2
3
4
5$ cd /Users/yourDir
$ touch Dockerfile
$ chmod +x Dockerfile
Dockerfile 添加 docker 命令构建docker镜像
1 | $ docker build -t yourImageName . |
- 运行这个镜像
1 | $ docker run -d –privileged -p yourOutPort:yourInPort –name yourContainerName yourImageName |


