
[NOTE]
version:apollo client 1.8.0
version:spring boot 2.1.9
本文假设你使用过apollo,熟悉基本的使用和操作,但想了解其本质。同时,本文以一条线的形式:”页面更新配置信息,app应用(apollo client)如何获取到变化”,沿着这个主线展开全文。
背景
我们部门的微服务架构中,关于配置中心,使用的是携程的apollo分布式配置中心。有配置管理后台对配置属性curd,业务app应用只要引入apollo-client pom,便可以获取到配置属性的value,使用起来很方便。
实际工作中,对配置属性进行更新还算是挺频繁的,而apollo支持配置属性的动态更新,这个技能带来了工作上和应用上的很大便利。本文就是围绕 配置自动更新 进行的。
apollo角色及关系
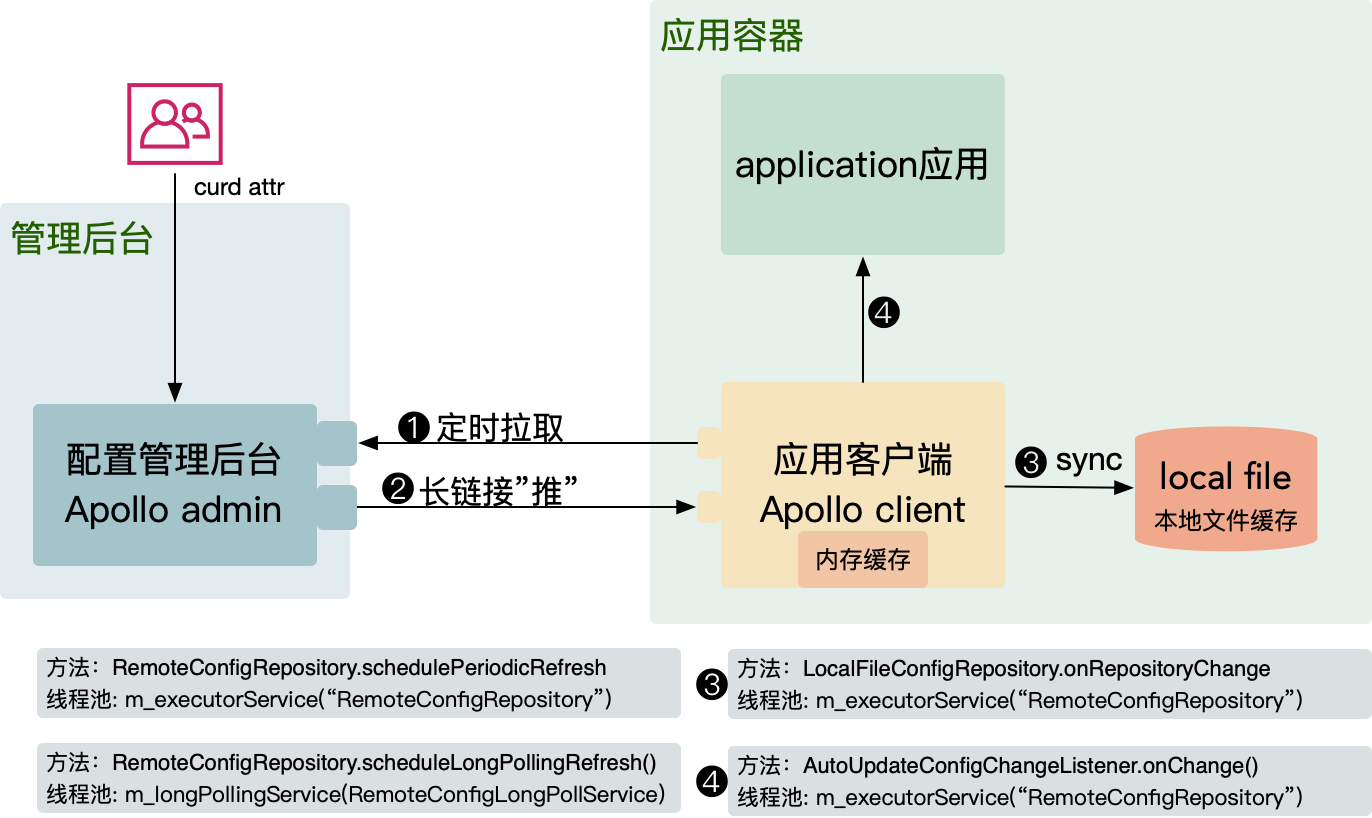
首先,我们梳理下apollo的角色及关系。如下图
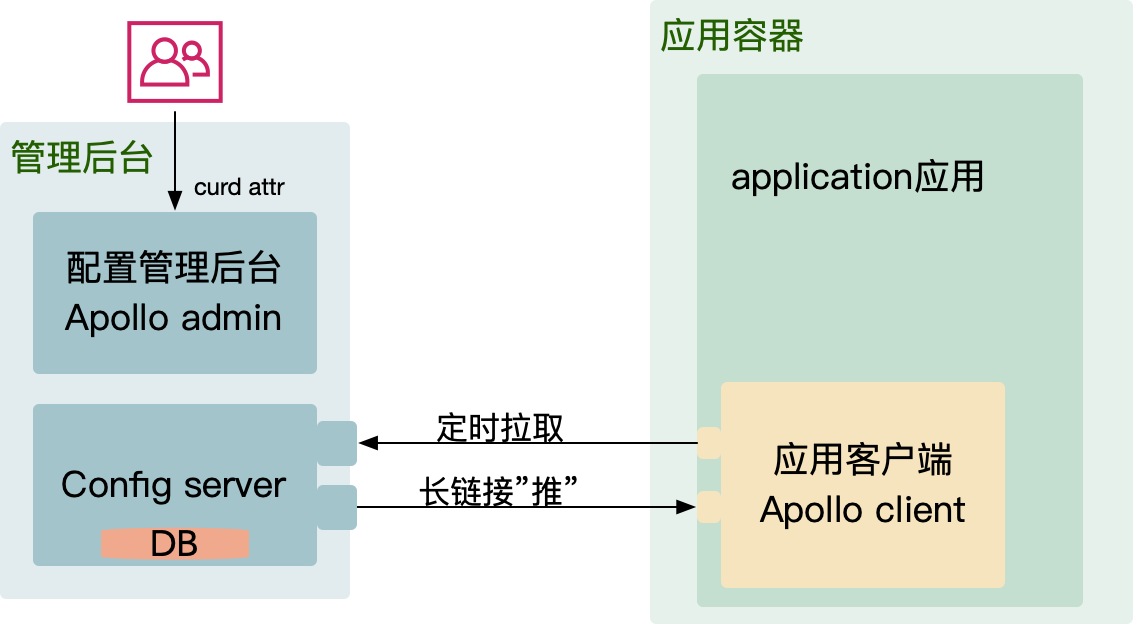
在后台添加/更新属性(value),发布,应用就可以得到添加/更新的属性及value了。这么一句话概括了自动更新。如此简单。
一句名句:对你越简单,对己越复杂。
所以,对我们来说,使用起来越简单,内部实现越是值得我们好好的弄明白,搞清楚。我们RD一直的愿望不正是做点有难度,有成就的事情吗,天天的 CURD 会把你磨烂
– 好,下面我们就开始深入apollo自动更新的内部和原理
这里,我们设想:配置数据是从左向右的流向。我们以apollo client为核心,apollo client的左侧是config service,apollo client 的右侧是 application应用。所以我们分两部分进行
- apollo client是怎么与 config service同步配置的,使用什么方式,我们从中能借鉴什么呢
- apollo client是怎么与 application应用(spring)同步配置的,使用什么方式,有什么技巧我们能学以致用的
apollo client 与 config service配置同步
通常,在实际使用时,apollo client 以 jar 的形式被引入到 application应用中。所以,apollo client 与 config service部署在不同的机器上,所以apollo client 与 config service 需要网络进行交互同步配置数据。在网络交互中,通过http无疑是最简单方便的。对于双方的同步方式上,无非是推?是拉?是结合?的方式。
那么对于apollo client,在与config service的同步上,正是采用了堆拉结合的方式。
下面我们通过代码详细了解实现细节,并从中能否学到一些技巧以用在我们自己的项目中。
为了更方便和直观的看代码和执行效果,最好设置如下:1
2logging.level.com.ctrip.framework.apollo=trace // apollo的代码执行详细打印出来
logging..level.other=info // 实际写法可能不是这样的
com.ctrip.framework.apollo.internals.RemoteConfigRepository 是我们关注的核心Class。它包含了和config service同步的所有事项与核心逻辑
在application应用启动时,spring boot会进行一系列的类加载、初始化操作。RemoteConfigRepository在这一波上被创建并实例化。初始化栈信息如下图:

其\1
2
3
4
5
6
7
8
9
10
11
12
13
14
15
16
17public RemoteConfigRepository(String namespace) {
m_namespace = namespace;
m_configCache = new AtomicReference<>();
m_configUtil = ApolloInjector.getInstance(ConfigUtil.class);
m_httpUtil = ApolloInjector.getInstance(HttpUtil.class);
m_serviceLocator = ApolloInjector.getInstance(ConfigServiceLocator.class);
remoteConfigLongPollService = ApolloInjector.getInstance(RemoteConfigLongPollService.class);
m_longPollServiceDto = new AtomicReference<>();
m_remoteMessages = new AtomicReference<>();
m_loadConfigRateLimiter = RateLimiter.create(m_configUtil.getLoadConfigQPS());
m_configNeedForceRefresh = new AtomicBoolean(true);
m_loadConfigFailSchedulePolicy = new ExponentialSchedulePolicy(m_configUtil.getOnErrorRetryInterval(),
m_configUtil.getOnErrorRetryInterval() * 8);
this.trySync();
this.schedulePeriodicRefresh(); // 定时拉取
this.scheduleLongPollingRefresh(); // 长链接接收
}
拉-定时拉取
定时拉取的逻辑都在这个方法里了:this.schedulePeriodicRefresh()1
2
3
4
5
6
7
8
9
10
11
12
13
14
15
16
17
18RemoteConfigRepository.schedulePeriodicRefresh method
private final static ScheduledExecutorService m_executorService = Executors.newScheduledThreadPool(1, ApolloThreadFactory.create("RemoteConfigRepository", true));
private void schedulePeriodicRefresh() {
...
m_executorService.scheduleAtFixedRate(
new Runnable() {
@Override
public void run() {
trySync();
}
}, m_configUtil.getRefreshInterval(), m_configUtil.getRefreshInterval(), m_configUtil.getRefreshIntervalTimeUnit()
);
}
默认:
m_configUtil.getRefreshInterval() = 5
m_configUtil.getRefreshIntervalTimeUnit() = MINUTES
可以看到,定时拉取的核心是通过定义了一个定时线程池,默认是延迟5min & 每隔5min执行一次。
trySync()方法会调用模板方法sync()1
2
3
4
5
6
7
8
9
10
11RemoteConfigRepository.sync method
protected synchronized void sync() {
ApolloConfig previous = m_configCache.get();
ApolloConfig current = loadApolloConfig(); // ①
//reference equals means HTTP 304
if (previous != current) {
m_configCache.set(current);
this.fireRepositoryChange(m_namespace, this.getConfig()); // ②
}
}
① loadApolloConfig() 通过http接口获取到config service的数据缓存起来:RemoteConfigRepository.m_configCache
这里有个约定:response code 如果是 304,则表示config service无变化,即无需更新,此时直接从RemoteConfigRepository.m_configCache 获取返回
此时的http请求为:1
http://{ip:port}/configs/{appId}/{cluster}}/application?ip={configServiceIp}&messages={"details":{"\{appId+env+namespace\}":\{instanceId\}}}&releaseKey={xxxxx}
http请求前后的关键日志:
② this.fireRepositoryChange(m_namespace, this.getConfig()) 将新的属性和value 发送给各个监听器listener所使用
1 | protected void fireRepositoryChange(String namespace, Properties newProperties) { |
由于监听器的逻辑被多个同步方式所使用,我们抽离出专门的地方
回顾整个定时拉取的过程,一句话总结:通过定时线程池,每5min执行一次,在 loadApolloConfig()方法执行 http请求,获取 config service 的配置数据,再通过 fireRepositoryChange() 把新的属性和value 传给各个监听器listener。整个拉的过程还是比较简单的。
“推”的过程相对就比较复杂了
“推”-长链接接收
长链接的入口虽然是 RemoteConfigRepository.scheduleLongPollingRefresh(),但是整个长链接的核心逻辑是在 RemoteConfigLongPollService.startLongPolling() 中
1 | RemoteConfigRepository.scheduleLongPollingRefresh() |
1 | RemoteConfigLongPollService.startLongPolling() method |
这里的”推”是用引号的。所以这个”推”和我们平时理解的不一样。怎么个不一样呢
一般对于”推”模式而言,要么是被通知(被调用),要么是无限轮训(假推真拉)。apollo采用的是类似后者,这里打个问好:为啥要用后者呢
从m_longPollingService属性的定义可知:定义了一个单线程的线程池,然后开始一个任务,任务中执行了 doLongPollingRefresh方法。1
2
3
4
5
6
7
8
9
10
11
12
13
14
15
16
17
18
19
20
21
22
23
24
25
26
27
28
29RemoteConfigLongPollService.doLongPollingRefresh() method
private final AtomicBoolean m_longPollingStopped = new AtomicBoolean(false);
private void doLongPollingRefresh(String appId, String cluster, String dataCenter, String secret) {
final Random random = new Random();
ServiceDTO lastServiceDto = null;
while (!m_longPollingStopped.get() && !Thread.currentThread().isInterrupted()) {
... // 限流设置
if (lastServiceDto == null) {
List<ServiceDTO> configServices = getConfigServices();
lastServiceDto = configServices.get(random.nextInt(configServices.size()));
}
String url = assembleLongPollRefreshUrl(lastServiceDto.getHomepageUrl(), appId, cluster, dataCenter, m_notifications);
logger.debug("Long polling from {}", url); // ➀
HttpRequest request = new HttpRequest(url);
final HttpResponse<List<ApolloConfigNotification>> response = m_httpUtil.doGet(request, m_responseType);
logger.debug("Long polling response: {}, url: {}", response.getStatusCode(), url); // ➁
if (response.getStatusCode() == 200 && response.getBody() != null) {
updateNotifications(response.getBody());
updateRemoteNotifications(response.getBody());
transaction.addData("Result", response.getBody().toString());
notify(lastServiceDto, response.getBody()); // ➂
}
...
}
}
apollo官方说了,双方的交互逻辑为: “客户端(apollo client)会发起一个Http请求到服务端(config service),服务端会保持住(Hold)这个连接60秒。如果在60秒内有客户端关心的配置变化,被保持住的客户端请求会立即返回,并告知客户端有配置变化的namespace信息,客户端会据此拉取对应namespace的最新配置;如果在60秒内没有配置变化,那么会返回Http状态码304给客户端。客户端在收到服务端响应请求后会立即重新发起连接”
那么代码层面是如何实现的?都在doLongPollingRefresh里。
doLongPollingRefresh 方法精简后如上,可以看到,方法内有个while循环,循环的两个终止条件:m_longPollingStopped 为 true && current Thread 被打断。这个while及条件是实现”推”的关键。
试想终止条件不满足,那么while循环会一直进行下去。所以,while循环对应的就是”客户端在收到服务端响应请求后会立即重新发起连接”。
那60s是怎么实现的呢?看循环内的 http get 调用 config service 获取配置数据。乍一看,没啥特殊的,注意下两个➀ ➁处的log代码语句,request 和 response 之间时间间隔为1min。由此证明了服务器保持60s,然后再返回给客户端。从而实现了”推”的逻辑。现在,这个特别的”推”算是真相大白了1
22022-04-13 20:38:09.570 DEBUG 17576 --- [ngPollService-1] c.c.f.a.i.RemoteConfigLongPollService : Long polling from http://ip:port
2022-04-13 20:39:05.173 DEBUG 17576 --- [ngPollService-1] c.c.f.a.i.RemoteConfigLongPollService : Long polling response: 304,

这个特别的”推”,本质还是拉取。那为什么这样设计?
因为,如果client太多,要推送的内容以及次数太多,会消耗服务器资源。你可能会说:如果客户端保持住60s,那不是更省服务器资源吗 (服务器就不用hold 60s了)。假如按这个方案实现,想想这个场景:第30s的时候,服务器更新了配置,客户端如何能立刻感知到变化呢,它是每隔60s一次调用。所以”客户端保持住60s”的方案不能实现立刻更新的诉求。
现在客户端(apollo client) 与 服务端(config service)的配置同步实现了。现在假设服务器有更新配置,那么response code=200,那么通知逻辑开始执行。即notify方法开始执行1
2
3
4
5
6
7
8
9
10
11
12RemoteConfigLongPollService.notify() method
private void notify(ServiceDTO lastServiceDto, List<ApolloConfigNotification> notifications) {
for (ApolloConfigNotification notification : notifications) {
String namespaceName = notification.getNamespaceName();
List<RemoteConfigRepository> toBeNotified = Lists.newArrayList(m_longPollNamespaces.get(namespaceName));
toBeNotified.addAll(m_longPollNamespaces.get(String.format("%s.%s", namespaceName, ConfigFileFormat.Properties.getValue())));
for (RemoteConfigRepository remoteConfigRepository : toBeNotified) {
remoteConfigRepository.onLongPollNotified(lastServiceDto, remoteMessages);
}
}
}
方法主要是进行获取namespace对应的 remoteConfigRepository 实例,然后执行 remoteConfigRepository.onLongPollNotified(lastServiceDto, remoteMessages)。
你可能有疑问:m_longPollNamespaces啥时候put的remoteConfigRepository呢,请回看 remoteConfigRepository.submit方法即可。看到 RemoteConfigRepository 你是否想起了刚刚说过的”定时拉取”的逻辑
1 | RemoteConfigRepository.onLongPollNotified method |
如果没有想起来,在onLongPollNotified中看到了 trySync() 方法,现在你想起来了吧?对的,”定时拉取”最后也是执行了 trySync() 方法。即”拉”,”推”都交汇到了一个点上:trySync()
我们通过调用栈图的形式描述下这个交汇点
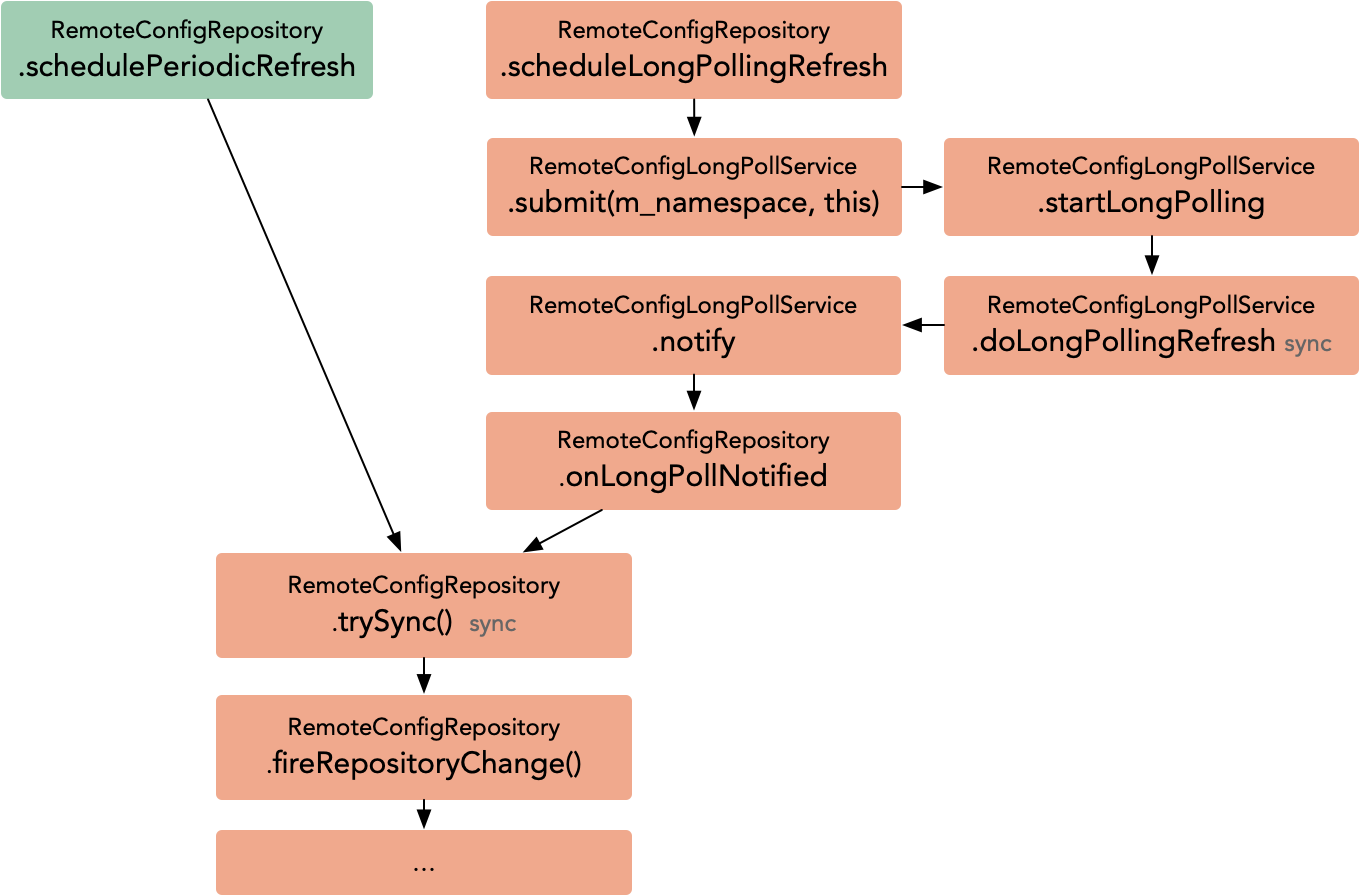
正如在”定时拉取”章节介绍的那样:trySync()会执行this.fireRepositoryChange(m_namespace, this.getConfig()),从而将新的属性和value被各个监听器listener所使用
监听器listener 获取更新的配置
通过以上,无论是定时拉还是长链接”推”,此时,我们都已拿到了config service服务器端的最新的配置。此时两种方式否不约而同的异步执行this.fireRepositoryChange(m_namespace, this.getConfig()),从而将新的属性和value被各个监听器listener所使用。
我们看下代码1
2
3
4
5
6
7RemoteConfigRepository.fireRepositoryChange method
protected void fireRepositoryChange(String namespace, Properties newProperties) {
    for (RepositoryChangeListener listener : m_listeners) {
        listener.onRepositoryChange(namespace, newProperties);
    }
}
我们知道,apollo client 会在application应用本地持久化一份config service的配置信息。所以,此时的m_listerners 指的是 LocalFileConfigRepository,即更新local file1
2
3
4
5
6
7
8LocalFileConfigRepository.onRepositoryChange
public void onRepositoryChange(String namespace, Properties newProperties) {
Properties newFileProperties = propertiesFactory.getPropertiesInstance();
newFileProperties.putAll(newProperties);
updateFileProperties(newFileProperties, m_upstream.getSourceType()); // 这里即具体更新local file的逻辑
this.fireRepositoryChange(namespace, newProperties);
}
updateFileProperties 即是详解更新local file的逻辑,核心思路:通过m_fileProperties.store(new FileOutputStream(file)) 以流的方式一股脑的将最新的配置数据持久化到本地文件
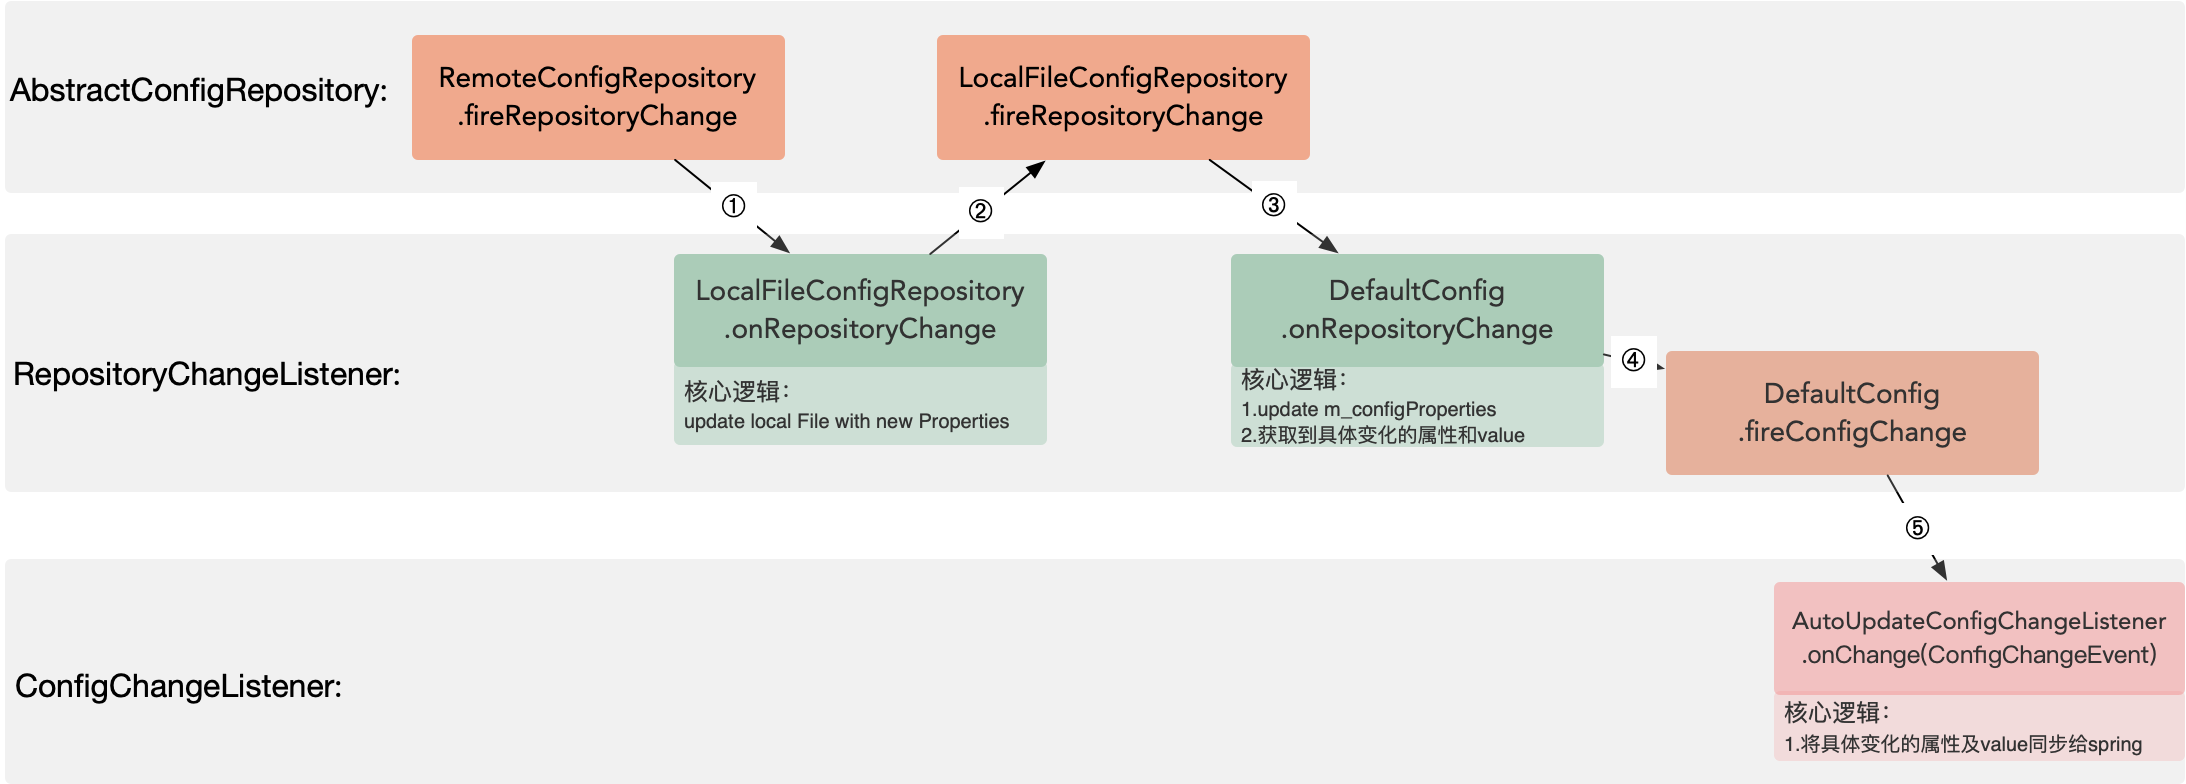
接着看代码:this.fireRepositoryChange(…),注意这里,名字和上面的方法一样的。从 RemoteConfigRepository.fireRepositoryChange 到 LocalFileConfigRepository.fireRepositoryChange。其实这是应用了 chain(责任链) 的模式,AbstractConfigRepository 是 RemoteConfigRepository 和 LocalFileConfigRepository 的父类。每个具体的 xxxConfigRepository都有自己的 List
m_listeners 属性;RepositoryChangeListener 同样是一个继承关系的模型,RepositoryChangeListener 是 DefaultConfig、LocalFileConfigRepository的父类。
AbstractConfigRepository 的继承模型、RepositoryChangeListener 的继承模型,及两者的调用关系如下图
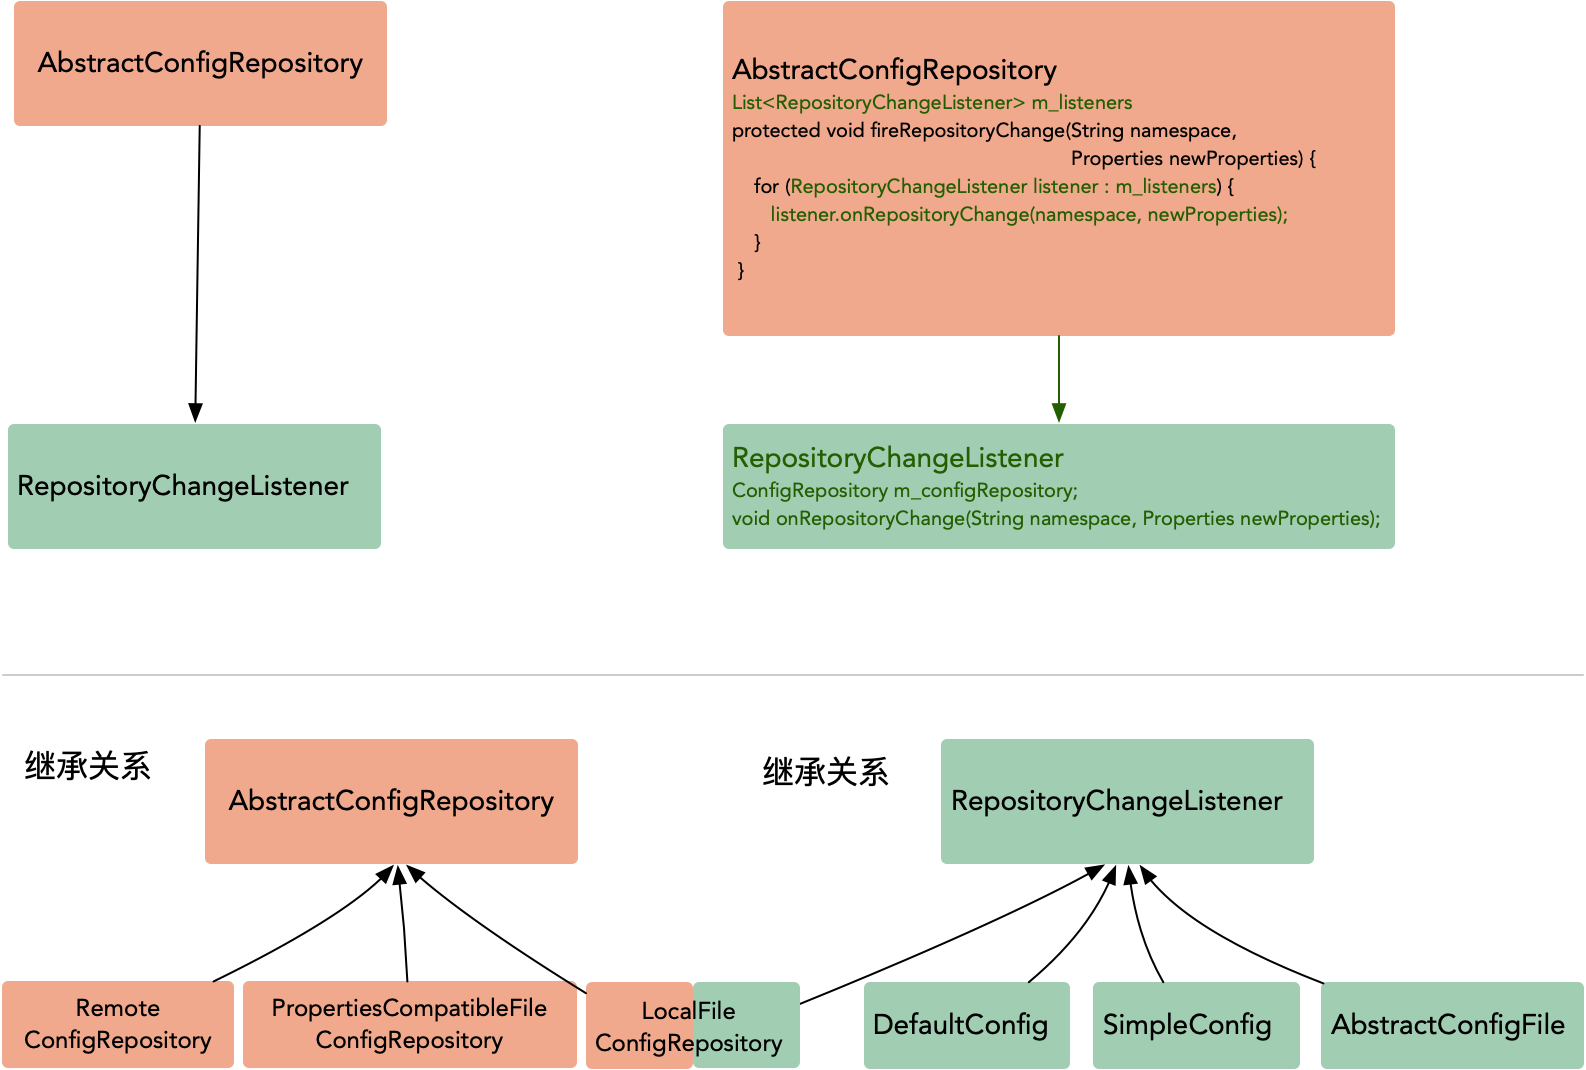
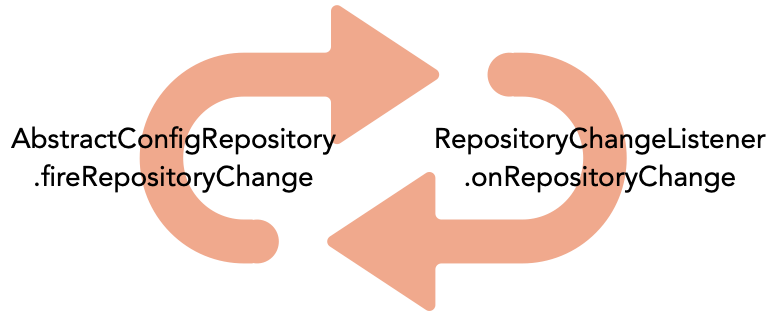
通过 chain(责任链) 的模式,RemoteConfigRepository.fireRepositoryChange 负责传递 RepositoryChangeListener,然后每个具体的 RepositoryChangeListener 负责处理自身的业务逻辑后,再使用它自身的RemoteConfigRepository 类型的字段属性,又会回调 RemoteConfigRepository.fireRepositoryChange。所以,RemoteConfigRepository 与 RepositoryChangeListener 形成了一个环形调用关系。如下图
我们接着看,当代码执行到 RemoteConfigRepository.fireRepositoryChange 时,其内部会链到listener的 RemoteConfig.onRepositoryChange 方法,方法的核心逻辑为提取出变化的属性和value,然后这个 RepositoryChangeListener 类型的listener 会将提取出的变化的属性和value 传递(fire)给 ConfigChangeListener 类型的 listener。
注意 listener 的类型的变化:RepositoryChangeListener -> ConfigChangeListener。RepositoryChangeListener 变化的整个配置,即变更的是整个Repository。而 ConfigChangeListener 变化的是 Repository 中具体的属性和其value,所以 apollo 的class起名还是很厉害了。
1 | RemoteConfig.fireConfigChange method |
从代码可看到,此时的listener 是ConfigChangeListener 类型。再通过debug,可知:listener是 AutoUpdateConfigChangeListener实例对象(ConfigChangeListener的子类),通过它的class 结构,可以看出它和spring framework 产生了联系(即与spring集成)
1 | public class AutoUpdateConfigChangeListener implements ConfigChangeListener{ |
我们开头列举的疑问:apollo client是怎么与 application应用(spring)同步配置的呢?这里应该就可以给出答案了。
到这里,我们小结下:梳理从bstractConfigRepository 到 RepositoryChangeListener 再到ConfigChangeListener 三者实例之间的调用顺序关系,如下图
apollo client 与 application应用(spring)配置同步
通过 AutoUpdateConfigChangeListener 的定义,我们看到了spring 的身影。看看他们是怎样结合的,逻辑都在 AutoUpdateConfigChangeListener.onChange()方法中
1 | public void onChange(ConfigChangeEvent changeEvent) { |
从上面可知,入参changeEvent包含了变化了的属性及其value,然后找到这个属性定义的地方(类),通过反射机制将变化后(最新的)的属性及其value 赋值到属性上。即更新完成。
一句话概括有些太草率了。我们通过一个实例来详细说下。
我定义一个class,包含一个注解了@ApolloJsonValue 的List1
2
3
4
5
6
7
8
9
10
11@Configuration
public class ApolloConfig {
@ApolloJsonValue("${app.craft}")
private List<String> craft;
.. // set get
}
apollo管理后台
namespace=application 配置如下
app.craft=[door, aa]
现在,我们将 app.craft 属性的value 改成 [door, bb] 并发布,此时我们看运行中的代码 AutoUpdateConfigChangeListener.onChange(ConfigChangeEvent changeEvent) 方法。
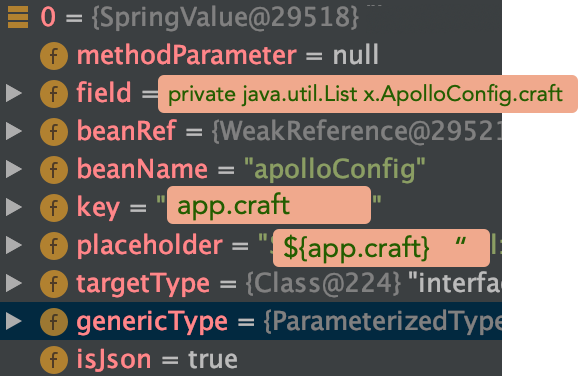
此时的 changeEvent 包含的即是 application下的 app.craft 属性的新旧value。onChange方法 (2)处的逻辑为通过app.craft在map类型的缓存中获取 app.craft 字段所在的实例对象及定义格式,及实例对象=ApolloConfig的实例 & 定义格式为@ApolloJsonValue(“${app.craft}”) private List
onChange方法当代码执行到(3)处时,就是通过反射赋新值了。方法栈如下1
2
3
4
5
6
7
8
9
10
11
12
13
14
15
16
17
18
19
20
21
22
23AutoUpdateConfigChangeListener.updateSpringValue method
private void updateSpringValue(SpringValue springValue) {
Object value = resolvePropertyValue(springValue); // springValue包含了属性的定义,所在的类等足够的信息
springValue.update(value); // 反射赋值
}
springValue.update method
public void update(Object newVal) throws IllegalAccessException, InvocationTargetException {
injectField(newVal);
}
springValue.injectField method
private void injectField(Object newVal) throws IllegalAccessException {
Object bean = beanRef.get();
boolean accessible = field.isAccessible();
field.setAccessible(true);
field.set(bean, newVal);
field.setAccessible(accessible);
}
实际值:
field=private java.util.List x.ApolloConfig.craft
bean=ApolloConfig实例
到这里,整个的配置自动更新的逻辑都完事了。文章开头的提问是不是已经清楚了呢
我们通过一张图展示 apollo client 与 config service,及apollo client 与 application应用(spring)的核心流程
附录
1.”推”过程套了几层线程
有一个问题需要注意:无论是拉取还是”推”,都使用线程池,这个好理解。你再看”推”的逻辑,你会发现整个”推”过程套了好几层线程的使用。数数套了几层?
RemoteConfigRepository.scheduleLongPollingRefresh method1
2
3
4
5
6
7
8
9
10
11
12
13
14
15RemoteConfigRepository.scheduleLongPollingRefresh() {
m_longPollingService.submit(new Runnable() { // 异步线程池 1 RemoteConfigLongPollService class
public void run() {
m_executorService.submit(new Runnable() { // 异步线程池 2 RemoteConfigRepository.onLongPollNotified class
public void run() {
m_executorService.submit(new Runnable() { // 异步线程池 3 DefaultConfig.fireConfigChange class
public void run() {
listener.onChange(changeEvent); // listener=ConfigChangeListener
}
});
}
});
}
});
}
可以看出,套了三层的异步,即”推”过程套了三层线程
2.启示
通过AutoUpdateConfigChangeListener这个apollo client 与 spring的集成,我们能得到什么启示呢。如果有个组件叫 winter。apollo client 要集成 winter,AutoUpdateConfigChangeListener是不是给了你很大的参照。
只要两步:
定义一个实现了 ConfigChangeListener 的 class “A”
创建 “A” 的一个实例 “a”,将 “a” 通过 AbstractConfig(Config).addChangeListener添加到 AbstractConfig.m_listeners集合中即可
do your DIY
3.想手动拿到apollo admin的配置数据
为什么会有这个想法呢?这个是我实际工作时的需求:
我有个java agent项目,想在app启动&类加载时解析代码的时刻获取到 apollo的配置数据,以匹配解析到的变量的实际值(实际值在apollo admin配置后台)。所以,也就是说,我要在应用的类加载时而不是服务启动后拿到apollo配置。
apollo提供了相当方便的方式,只要一行代码,如下1
Config config = ConfigService.getConfig(String namespace); // 这行代码在 ApolloApplicationContextInitializer中,所以读源码时,框架和细节都要关注


