
此篇是细节知多少-spring boot aop过程解析系列的第三篇,即第三阶段
spring boot的aop实现分为三个阶段
- AnnotationAwareAspectJAutoProxyCreator加载(初始化和实例化)阶段
- AnnotationAwareAspectJAutoProxyCreator使用post-process基于@Aspect验证beanName或beanClass是否可以生成Proxy代理类阶段
- CglibAopProxy或JdkDynamicAopProxy生成Proxy代理类阶段
上两个阶段的内容参见:
spring boot aop过程解析之阶段一:AnnotationAwareAspectJAutoProxyCreator加载(初始化和实例化)
spring boot aop过程解析之阶段二:判断beanName或beanClass是否生成Proxy代理类
这篇我们说下阶段三:CglibAopProxy或JdkDynamicAopProxy生成Proxy代理类阶段。
带着问题学习
带着问题学习往往起到更好的效果
问题:1
1. 什么时候什么位置在真实对象方法前后加上代理逻辑的
前提
实际工作中,我们都写过@Aspect的代码吧。我们这里定义一个,便于后面知识点阐述1
2
3
4
5
6
7
8
9
10
11
12
13
14
15
16
17
18
19
20
21
22
23
24
25@Aspect
@Component
public class TimeFeeAspect {
@Pointcut("execution(* com.yy..rest..*(..))")
public void cut(){}
@Before("cut()")
public void doTimeFeeIntercepter(JoinPoint joinPoint) throws Throwable {
System.out.println("args:" + joinPoint.getArgs());
System.out.println("target" + joinPoint.getTarget().toString());
}
}
package com.yy.rest;
@RestController
@RequestMapping("/user")
public class UserController {
@RequestMapping("/test")
public String test() {
return "success";
}
}
同上一篇一样,我们定义一个Aspect类,目的是对com.yy..rest包下所有的方法的访问都被切面切入,也就是要走doTimeFeeIntercepter()方法。同时,在com.yy.rest包下定义了一个类:UserController,充当目标类:targetClass,声明了一个方法:test(),从而在访问这个方法时,会被doTimeFeeIntercepter()方法切入
下面我们通过debug追踪源码,了解实现原理。
生成Proxy代理类入口
从上一篇 spring boot aop过程解析之阶段二:判断beanName或beanClass是否生成Proxy代理类,我们可以知道,当判断beanName或beanClass可以生成Proxy代理类时,就进行生成proxy代理类的操作了。如下图1
2
3
4
5
6
7
8
9
10
11
12
13
14
15
16
17
18
19
20
21
22
23
24
25
26AbstractAutoProxyCreator类
public Object postProcessBeforeInstantiation(Class<?> beanClass, String beanName) {
······
if (beanName != null) {
Object[] specificInterceptors = getAdvicesAndAdvisorsForBean(beanClass, beanName, targetSource);
Object proxy = createProxy(beanClass, beanName, specificInterceptors, targetSource);
return proxy;
}
}
AbstractAutoProxyCreator类
public Object postProcessAfterInitialization(Object bean, String beanName) {
······
return wrapIfNecessary(bean, beanName, cacheKey);
}
protected Object wrapIfNecessary(Object bean, String beanName, Object cacheKey) {
······
Object[] specificInterceptors = getAdvicesAndAdvisorsForBean(bean.getClass(), beanName, null);
if (specificInterceptors != DO_NOT_PROXY) {
Object proxy = createProxy(bean.getClass(), beanName, specificInterceptors, new SingletonTargetSource(bean));
this.proxyTypes.put(cacheKey, proxy.getClass());
return proxy;
}
return bean;
}
从上代码,我们知道AbstractAutoProxyCreator类的postProcessBeforeInstantiation()和postProcessAfterInitialization()方法都可以生成proxy代理类。都是调用的this.createProxy(..)`方法,这就是生成Proxy代理类入口,代码如下1
2
3
4
5
6
7
8
9
10
11
12
13
14
15
16
17
18
19
20
21
22
23
24
25
26protected Object createProxy(Class<?> beanClass, String beanName, Object[] specificInterceptors, TargetSource targetSource) {
ProxyFactory proxyFactory = new ProxyFactory(); //(1)
proxyFactory.copyFrom(this);
if (!proxyFactory.isProxyTargetClass()) {
// 检查时通过接口还是目标类创建proxy代理类,true表示通过标类创建
if (shouldProxyTargetClass(beanClass, beanName)) {
proxyFactory.setProxyTargetClass(true);
}
else {
evaluateProxyInterfaces(beanClass, proxyFactory);
}
}
Advisor[] advisors = buildAdvisors(beanName, specificInterceptors);//(2)
proxyFactory.addAdvisors(advisors);
proxyFactory.setTargetSource(targetSource);
customizeProxyFactory(proxyFactory);
proxyFactory.setFrozen(this.freezeProxy);
if (advisorsPreFiltered()) {
proxyFactory.setPreFiltered(true);
}
return proxyFactory.getProxy(getProxyClassLoader());
}
首先创建了一个ProxyFactory,看名字就知道含义:proxy的工厂。注意这句代码proxyFactory.copyFrom(this),其中的this为AnnotationAwareAspectJAutoProxyCreator对象,还记得吗,spring项目初始化时,aop相关实例化xxxProxyAutoConfiguration就是AnnotationAwareAspectJAutoProxyCreator类,他的proxyTargetClass和exposeProxy等属性通过proxyFactory.copyFrom(this)传递给proxyFactory属性。
然后通过buildAdvisors(beanName, specificInterceptors)方法构建advisor,看他的specificInterceptors参数,往上追溯可以知道是post-process方法传递进来的,结合spring boot aop过程解析之阶段二:判断beanName或beanClass是否生成Proxy代理类,我们可以知道specificInterceptors之一就是InstantiationModelAwarePointcutAdvisorImpl实例。所以生成的advisors包含InstantiationModelAwarePointcutAdvisorImpl实例,同时将advisors赋值给proxyFactory.addAdvisors(advisors)。接下来,通过proxyFactory.getProxy(getProxyClassLoader())生成proxy代理类
生成Proxy代理类
看下proxyFactory.getProxy(getProxyClassLoader())内部实现1
2
3public Object getProxy(ClassLoader classLoader) {
return createAopProxy().getProxy(classLoader);
}
只有一行代码,但是确包含很多内容,createAopProxy()是一部分;getProxy(classLoader)是另一部分
先说createAopProxy(),看内部实现1
2
3
4
5
6
7
8
9
10
11
12
13
14
15
16
17
18
19
20
21
22
23ProxyFactory类
protected final synchronized AopProxy createAopProxy() {
return getAopProxyFactory().createAopProxy(this);
}
public AopProxyFactory getAopProxyFactory() {
// aopProxyFactory = new DefaultAopProxyFactory()
return this.aopProxyFactory;
}
// DefaultAopProxyFactory类
public AopProxy createAopProxy(AdvisedSupport config) throws AopConfigException {
if (config.isOptimize() || config.isProxyTargetClass() || hasNoUserSuppliedProxyInterfaces(config)) {
Class<?> targetClass = config.getTargetClass();
if (targetClass.isInterface() || Proxy.isProxyClass(targetClass)) {
return new JdkDynamicAopProxy(config);
}
return new ObjenesisCglibAopProxy(config);
}
else {
return new JdkDynamicAopProxy(config);
}
}
createAopProxy方法正式创建xxxAopProxy了,到底是创建Jdk动态代理还是cglib动态代理呢,看条件,条件之一proxyTargetClass的值是我们所能控制的,因为可以在我们的项目启动类中加入类似@EnableAspectJAutoProxy(proxyTargetClass = true, exposeProxy = true)的配置。这是全局设置。还有每次创建proxy的设置:shouldProxyTargetClass(beanClass, beanName),逻辑为beanName有没有接口,有接口proxyTargetClass=false;没有接口,proxyTargetClass=true。对于我们开头定义的UserController,由于没有接口,所以生成代理时是cglib代理,即new ObjenesisCglibAopProxy(config),看其及父类构造函数1
2
3
4public CglibAopProxy(AdvisedSupport config){
this.advised = config;
this.advisedDispatcher = new AdvisedDispatcher(this.advised);
}
AdvisedSupport是proxyFactory的父类,CglibAopProxy拥有一个AdvisedSupport类型的advised属性,而这个advised拥有advisors、proxyTargetClass、exposeProxy等,所以CglibAopProxy就等于有了advisors、proxyTargetClass、exposeProxy。
aopProxy已经创建了,下面说另一部分:getProxy(classLoader),看内部代码1
2
3
4
5
6
7
8
9
10
11
12
13
14
15
16
17
18
19
20
21
22
23
24
25
26
27
28
29
30
31
32
33
34
35
36
37
38
39
40
41
42
43CglibAopProxy类
public Object getProxy(ClassLoader classLoader) {
Class<?> rootClass = this.advised.getTargetClass();
Class<?> proxySuperClass = rootClass;
// 这里判断rootClass是否是Cglib代理所产生的类(内部判断rootClass的className是否包含$$)
if (ClassUtils.isCglibProxyClass(rootClass)) {
proxySuperClass = rootClass.getSuperclass();
Class<?>[] additionalInterfaces = rootClass.getInterfaces();
for (Class<?> additionalInterface : additionalInterfaces) {
this.advised.addInterface(additionalInterface);
}
}
// 方法校验,final方法不能被代理,记录日志
validateClassIfNecessary(proxySuperClass, classLoader);
// Configure CGLIB Enhancer...
Enhancer enhancer = createEnhancer();
if (classLoader != null) {
enhancer.setClassLoader(classLoader);
if (classLoader instanceof SmartClassLoader &&
((SmartClassLoader) classLoader).isClassReloadable(proxySuperClass)) {
enhancer.setUseCache(false);
}
}
enhancer.setSuperclass(proxySuperClass);
enhancer.setInterfaces(AopProxyUtils.completeProxiedInterfaces(this.advised));
enhancer.setNamingPolicy(SpringNamingPolicy.INSTANCE);
enhancer.setStrategy(new ClassLoaderAwareUndeclaredThrowableStrategy(classLoader));
Callback[] callbacks = getCallbacks(rootClass);
Class<?>[] types = new Class<?>[callbacks.length];
for (int x = 0; x < types.length; x++) {
types[x] = callbacks[x].getClass();
}
// fixedInterceptorMap only populated at this point, after getCallbacks call above
enhancer.setCallbackFilter(new ProxyCallbackFilter(
this.advised.getConfigurationOnlyCopy(), this.fixedInterceptorMap, this.fixedInterceptorOffset));
enhancer.setCallbackTypes(types);
// Generate the proxy class and create a proxy instance.
return createProxyClassAndInstance(enhancer, callbacks);
}
getProxy()方法会创建一个Enhancer对象,这个工具类负责生成代理类的class,只不过这个class不是文本的形式,而是在内存中。Enhancer`会被赋值生成proxy代理类是用于的属性,说下这些属性即作用
- superclass:目标类
- Interfaces:目标类和代理类的接口
- namingPolicy:生成代理类名称策略, 如”xxx\$\$EnhancerBySpringCGLIB$$d2e4a5ae”这个文本形式就是namingPolicy生成的
- strategy:生成代理类class策略
- callbackFilter:设置对不同方法执行不同的回调逻辑,或者根本不执行回调
- callBackTypes:都会赋值给Enhancer对象用于生成Proxy代理类。callBackTypes就是aop interceptor,CGLIB中对于方法的拦截是通过将自定义的拦截器(实现MethodInterceptor接口)加入Callback中并在调用代理时直接激活拦截器中的intercept方法来实现的,DynamicAdvisedInterceptor继承自MethodInterceptor,而包含AspectJMethodBeforeAdvice的advised属性又封装在DynamicAdvisedInterceptor中,DynamicAdvisedInterceptor又赋值到callBack。所以当我们curl访问目标类方法时会被proxy代理类的拦截器拦截,继而会走切面的AspectJMethodBeforeAdvice对象的方法执行切面逻辑。下面就详细下CallbackTypes,看getCallbacks方法代码,如下
1
2
3
4
5
6
7
8
9
10
11
12
13
14
15
16
17
18
19
20
21
22
23
24
25
26
27
28
29
30
31
32
33
34
35
36
37
38
39private Callback[] getCallbacks(Class<?> rootClass) throws Exception {
// Parameters used for optimization choices...
boolean exposeProxy = this.advised.isExposeProxy();
boolean isFrozen = this.advised.isFrozen();
boolean isStatic = this.advised.getTargetSource().isStatic();
// Choose an "aop" interceptor (used for AOP calls).
Callback aopInterceptor = new DynamicAdvisedInterceptor(this.advised);
// Choose a "straight to target" interceptor. (used for calls that are
// unadvised but can return this). May be required to expose the proxy.
Callback targetInterceptor;
if (exposeProxy) {
targetInterceptor = isStatic ?
new StaticUnadvisedExposedInterceptor(this.advised.getTargetSource().getTarget()) :
new DynamicUnadvisedExposedInterceptor(this.advised.getTargetSource());
}
else {
targetInterceptor = isStatic ?
new StaticUnadvisedInterceptor(this.advised.getTargetSource().getTarget()) :
new DynamicUnadvisedInterceptor(this.advised.getTargetSource());
}
// Choose a "direct to target" dispatcher (used for
// unadvised calls to static targets that cannot return this).
Callback targetDispatcher = isStatic ?
new StaticDispatcher(this.advised.getTargetSource().getTarget()) : new SerializableNoOp();
Callback[] mainCallbacks = new Callback[] {
aopInterceptor, // for normal advice
targetInterceptor, // invoke target without considering advice, if optimized
new SerializableNoOp(), // no override for methods mapped to this
targetDispatcher, this.advisedDispatcher,
new EqualsInterceptor(this.advised),
new HashCodeInterceptor(this.advised)
};
Callback[] callbacks;
}
可以看到,mainCallbacks是最终生成的callbacks,包含7个callback,属于几类,分别说下
- DynamicAdvisedInterceptor:核心的aop interceptor,aspect的AspectJMethodBeforeAdvice就被赋值在这里。访问业务方法时就会先访问DynamicAdvisedInterceptor的intercept方法,详情看此方法
- StaticUnadvisedExposedInterceptor:用于没有advice chain的静态目标
- SerializableNoOp 什么操作也不做,代理类直接调用被代理的方法不进行拦截
- Dispatcher 每次调用都会重新加载被代理的对象
···
下面看下getProxy方法createProxyClassAndInstance方法,这个方法创建proxy class并实例化为instance,看下内部代码1
2
3
4
5
6
7
8
9
10
11
12
13
14
15
16
17
18
19
20
21
22
23
24
25
26
27
28
29
30
31
32
33
34
35
36
37
38
39
40
41
42
43
44
45
46
47
48
49
50
51
52
53
54
55
56
57
58
59
60
61
62
63
64
65
66
67
68
69
70
71
72
73
74
75
76
77
78
79
80
81
82
83
84
85
86
87
88
89
90
91
92protected Object createProxyClassAndInstance(Enhancer enhancer, Callback[] callbacks) {
// 创建class
Class<?> proxyClass = enhancer.createClass();
// 实例化proxyClass为instance
Object proxyInstance = proxyInstance = objenesis.newInstance(proxyClass, enhancer.getUseCache());
((Factory) proxyInstance).setCallbacks(callbacks);
return proxyInstance;
}
private Object createHelper() {
Object key = KEY_FACTORY.newInstance(this.superclass != null ? this.superclass.getName() : null, ReflectUtils.getNames(this.interfaces), this.filter == ALL_ZERO ? null : new WeakCacheKey(this.filter), this.callbackTypes, this.useFactory, this.interceptDuringConstruction, this.serialVersionUID);
Object result = super.create(key);
return result;
}
protected Object create(Object key) {
ClassLoader loader = this.getClassLoader();
Map<ClassLoader, AbstractClassGenerator.ClassLoaderData> cache = CACHE;
AbstractClassGenerator.ClassLoaderData data = (AbstractClassGenerator.ClassLoaderData)cache.get(loader);
// 此处又使用了双重检查机制(double check and synchronized)来避免锁竞争,这个机制在java和spring中多次使用
if (data == null) {
synchronized(AbstractClassGenerator.class) {
data = (AbstractClassGenerator.ClassLoaderData)cache.get(loader);
if (data == null) {
data = new AbstractClassGenerator.ClassLoaderData(loader);
}
}
}
this.key = key;
// 获取class
Object obj = data.get(this, this.getUseCache());
return obj instanceof Class ? this.firstInstance((Class)obj) : this.nextInstance(obj);
}
public Object get(AbstractClassGenerator gen, boolean useCache) {
if (!useCache) {
// 生成代理类
return gen.generate(this);
} else {
Object cachedValue = this.generatedClasses.get(gen);
return gen.unwrapCachedValue(cachedValue);
}
}
protected V createEntry(final K key, KK cacheKey, Object v) {
FutureTask task = new FutureTask(new Callable<V>() {
public V call() throws Exception {
// 异步执行下面的generate()方法
return LoadingCache.this.loader.apply(key);
}
});
}
task.run();
return ask.get();
}
// future新起了一个线程来完成这个生成逻辑
protected Class generate(AbstractClassGenerator.ClassLoaderData data) {
String className;
synchronized(classLoader) {
// 声明代理类的名字
className = this.generateClassName(data.getUniqueNamePredicate());
}
// 使用指定策略生成代理类字节流数组
byte[] b = this.strategy.generate(this);
className = ClassNameReader.getClassName(new ClassReader(b));
// 生成代理类
gen = ReflectUtils.defineClass(className, b, classLoader, protectionDomain);
return gen;
}
private String generateClassName(Predicate nameTestPredicate) {
// 使用指定的name生成政策生成代理类的名字
return this.namingPolicy.getClassName(this.namePrefix, this.source.name, this.key, nameTestPredicate);
}
public String getClassName(String prefix, String source, Object key, Predicate names) {
if (prefix == null) {
prefix = "org.springframework.cglib.empty.Object";
} else if (prefix.startsWith("java")) {
prefix = "$" + prefix;
}
String base = prefix + "$$" + source.substring(source.lastIndexOf(46) + 1) + this.getTag() + "$$" + Integer.toHexString(STRESS_HASH_CODE ? 0 : key.hashCode());
String attempt = base;
for(int var7 = 2; names.evaluate(attempt); attempt = base + "_" + var7++) {
}
return attempt;
}
上述代码着重贴了proxy代理类的名字的生成过程,这是平时你debug代理类时常看见的名字。所以了解名字的生成过程有助于你理解更深层的东西。
生成的class文件我们可以输出到.class
到这,proxy代理类的生成过程就说完了,整个过程生成的代理类都是在内存的,我们可以通过设置,将内存中生成的代理类class字节码输出到硬盘的.class文件中,输出到.class的方法见文末扩展部分1
2
3
4
5
6
7
8
9
10
11
12
13
14
15
16
17
18
19
20
21
22
23
24
25
26
27
28
29
30
31
32
33
34
35
36
37
38
39
40
41
42
43
44
45
46
47
48
49
50
51
52
53
54
55
56
57package com.yy.rest;
import **
public class UserController$$EnhancerBySpringCGLIB$$bd9c2334 extends UserController implements SpringProxy, Advised, Factory {
private boolean CGLIB$BOUND;
public static Object CGLIB$FACTORY_DATA;
private static final ThreadLocal CGLIB$THREAD_CALLBACKS;
private static final Callback[] CGLIB$STATIC_CALLBACKS;
private MethodInterceptor CGLIB$CALLBACK_0;
private MethodInterceptor CGLIB$CALLBACK_1;
private NoOp CGLIB$CALLBACK_2;
private Dispatcher CGLIB$CALLBACK_3;
private Dispatcher CGLIB$CALLBACK_4;
private MethodInterceptor CGLIB$CALLBACK_5;
private MethodInterceptor CGLIB$CALLBACK_6;
private static Object CGLIB$CALLBACK_FILTER;
private static final Method CGLIB$test$0$Method;
private static final MethodProxy CGLIB$test$0$Proxy;
private static final Object[] CGLIB$emptyArgs;
private static final Method CGLIB$queryOne$1$Method;
private static final MethodProxy CGLIB$queryOne$1$Proxy;
private static final Method CGLIB$hello$2$Method;
private static final MethodProxy CGLIB$hello$2$Proxy;
private static final Method CGLIB$equals$3$Method;
private static final MethodProxy CGLIB$equals$3$Proxy;
private static final Method CGLIB$toString$4$Method;
private static final MethodProxy CGLIB$toString$4$Proxy;
private static final Method CGLIB$hashCode$5$Method;
private static final MethodProxy CGLIB$hashCode$5$Proxy;
private static final Method CGLIB$clone$6$Method;
private static final MethodProxy CGLIB$clone$6$Proxy;
final String CGLIB$test$0() {
return super.test();
}
public final String test() {
try {
MethodInterceptor var10000 = this.CGLIB$CALLBACK_0;
if (var10000 == null) {
CGLIB$BIND_CALLBACKS(this);
var10000 = this.CGLIB$CALLBACK_0;
}
// var10000实际上是DynamicAdvisedInterceptor类
return var10000 != null ? (String)var10000.intercept(this, CGLIB$test$0$Method, CGLIB$emptyArgs, CGLIB$test$0$Proxy) : super.test();
} catch (Error | RuntimeException var1) {
throw var1;
} catch (Throwable var2) {
throw new UndeclaredThrowableException(var2);
}
}
......
}
这里只列出了test方法的代码,还有很多其他的方法代码,运行你的代码就可以看到全部了
访问业务方法
下面我们看下访问controller方法时是怎样走入代理类的方法的,又怎么进入切面的方法的,最后又是怎么进去目标方法的
在浏览器或者命令行访问链接:http://localhost:20282/user/test。通过下图的调用栈可以看到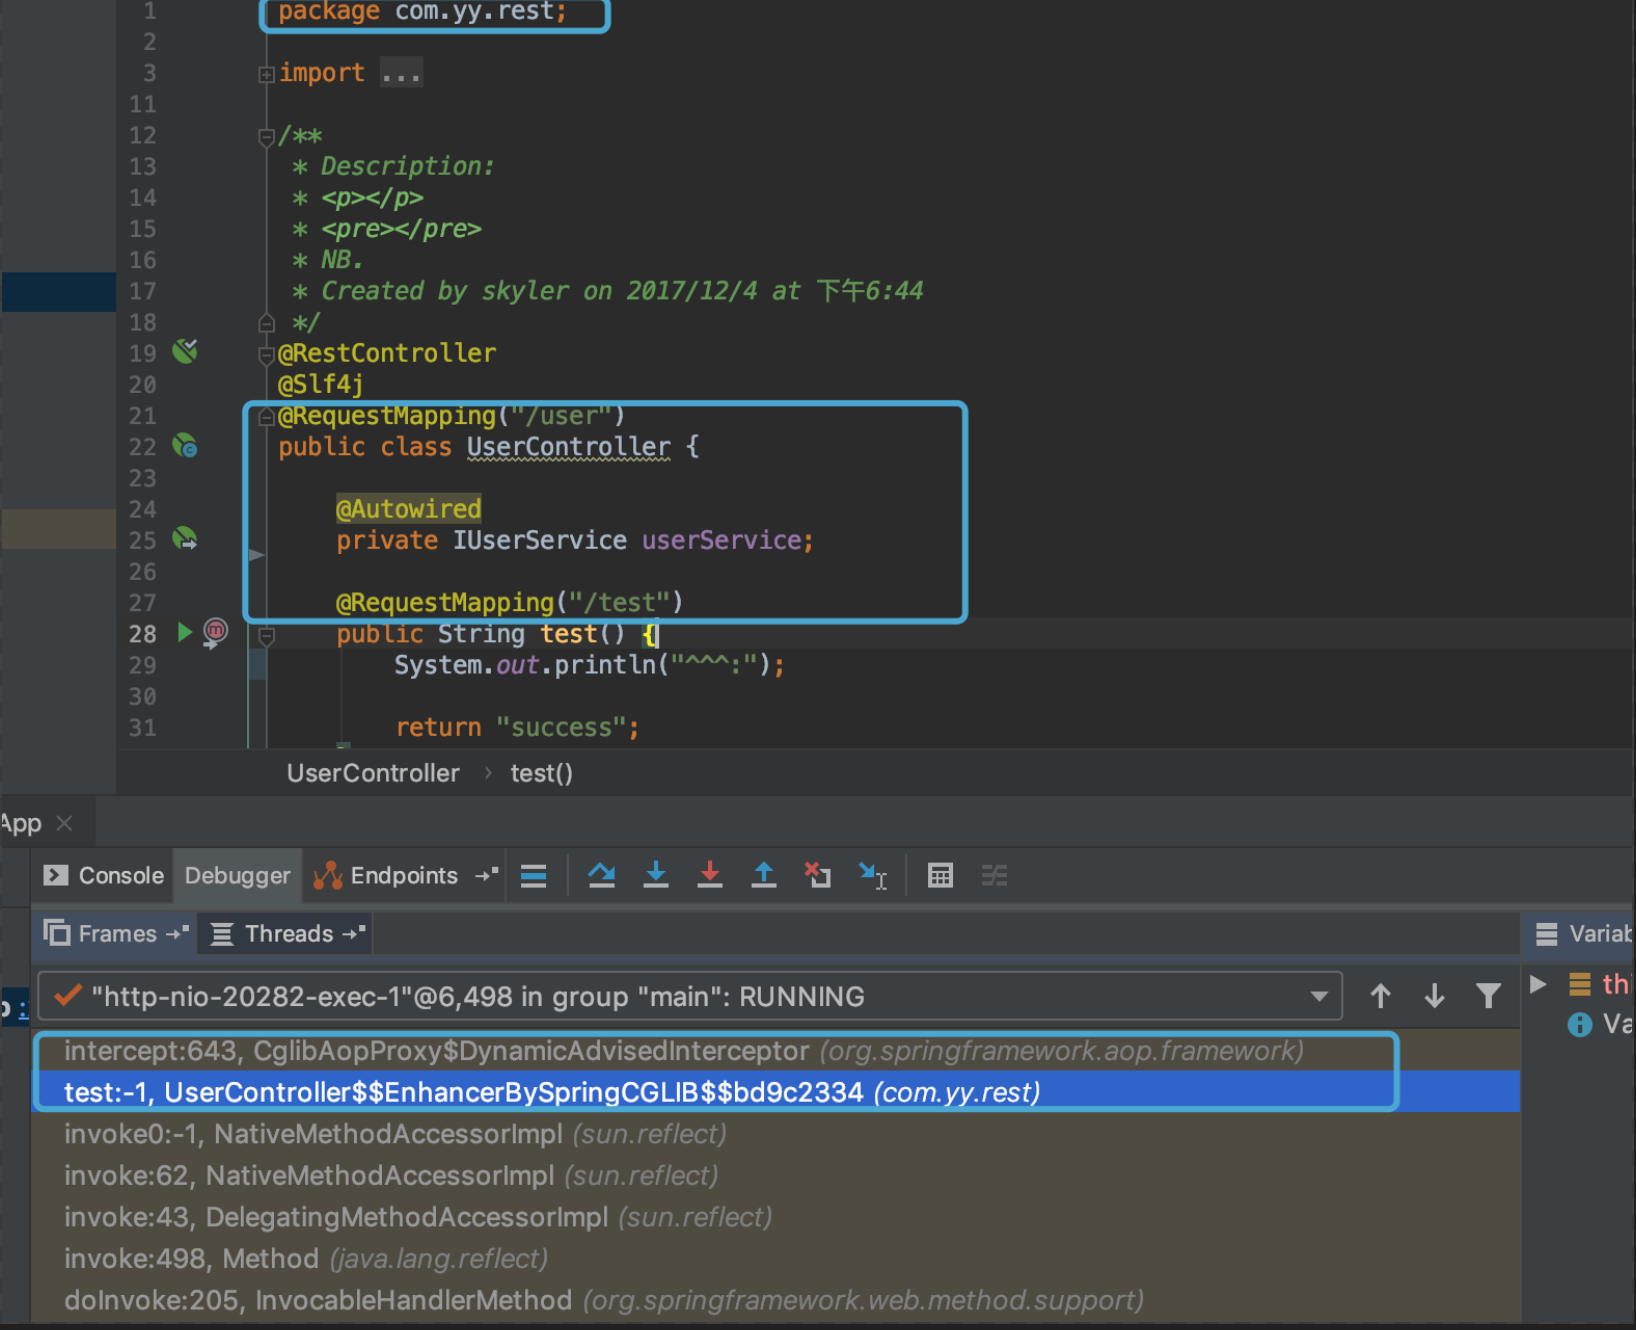
首先访问了UserController代理类:UserController\$\$EnhancerBySpringCGLIB$$bd9c2334的方法,从UserController\$\$EnhancerBySpringCGLIB\$\$bd9c2334的源码我们知道,它的test方法内引用了MethodInterceptor类型属性,所以调用了DynamicAdvisedInterceptor.intercept()方法。我们看下这个方法的内部1
2
3
4
5
6
7
8
9
10
11
12
13
14
15
16
17
18
19
20
21
22
23
24public Object intercept(Object proxy, Method method, Object[] args, MethodProxy methodProxy) throws Throwable {
try {
oldProxy = AopContext.setCurrentProxy(proxy);
targetClass = target.getClass();
// 获取MethodInterceptor集合,而相应的MethodInterceptor包含对应的Advice类型属性
List<Object> chain = this.advised.getInterceptorsAndDynamicInterceptionAdvice(method, targetClass); // (1)
if (chain.isEmpty() && Modifier.isPublic(method.getModifiers())) {
// 直接调用目标方法
retVal = methodProxy.invoke(target, argsToUse);
}
else {
// We need to create a method invocation...
retVal = new CglibMethodInvocation(proxy, target, method, args, targetClass, chain, methodProxy).proceed();// (2)
}
retVal = processReturnType(proxy, target, method, retVal);
return retVal;
}
finally {
AopContext.setCurrentProxy(oldProxy);
}
}
方法(1)处获取MethodIntercetor集合,从而获取对应的dvice集合,如下图
方法(2)处创建一个CglibMethodInvocation,CglibMethodInvocation拥有一个MethodInterceptor集合,通过proceed()方法执行interceptor chain。所有这里运用了一个设计模式:责任链模式的变种,类似tomcat filter的形式。
具体如下,运行这个链的入口是DynamicAdvisedInterceptor.intercept()。这个方法会获取interceptor集合,然后创建一个CglibMethodInvocation对象,并把interceptor集合传递给CglibMethodInvocation对象的interceptorsAndDynamicMethodMatchers属性, 然后调用CglibMethodInvocation对象的proceed(),proceed()会遍历interceptorsAndDynamicMethodMatchers(其实就是interceptor集合)从而执行每个interceptor.invoke(MethodInvocation)自身的逻辑,因为这个时候MethodInvocation会传递给invoke方法,所以每一个invoke方法内部都会执行MethodInvocation.proceed(),从而这样形成了一个链式的调用关系。我们看下链式代码结构1
2
3
4
5
6
7
8
9
10
11
12
13
14
15
16
17
18
19
20
21
22
23MethodInvocation类
public Object proceed() throws Throwable {
// 链式调用终结点
if (this.currentInterceptorIndex == this.interceptorsAndDynamicMethodMatchers.size() - 1) {
return invokeJoinpoint();
}
// 从interceptor集合中获取一个interceptor
Object interceptorOrInterceptionAdvice =
this.interceptorsAndDynamicMethodMatchers.get(++this.currentInterceptorIndex);
// 调用这个interceptor.invoke方法,开始走链了
return ((MethodInterceptor) interceptorOrInterceptionAdvice).invoke(this);
}
MethodInterceptor类
public interface MethodInterceptor extends Interceptor {
Object invoke(MethodInvocation invocation) throws Throwable;
}
MethodInterceptor实现类
public Object invoke(MethodInvocation mi) throws Throwable {
// 又调回MethodInvocation.proceed()方法
return mi.proceed();
}
以上就是链式调用的代码结构,现在通过结构流程图的方法更直观的看下
todo
因为这里我们只有一个interceptor,所以只执行它了,如下图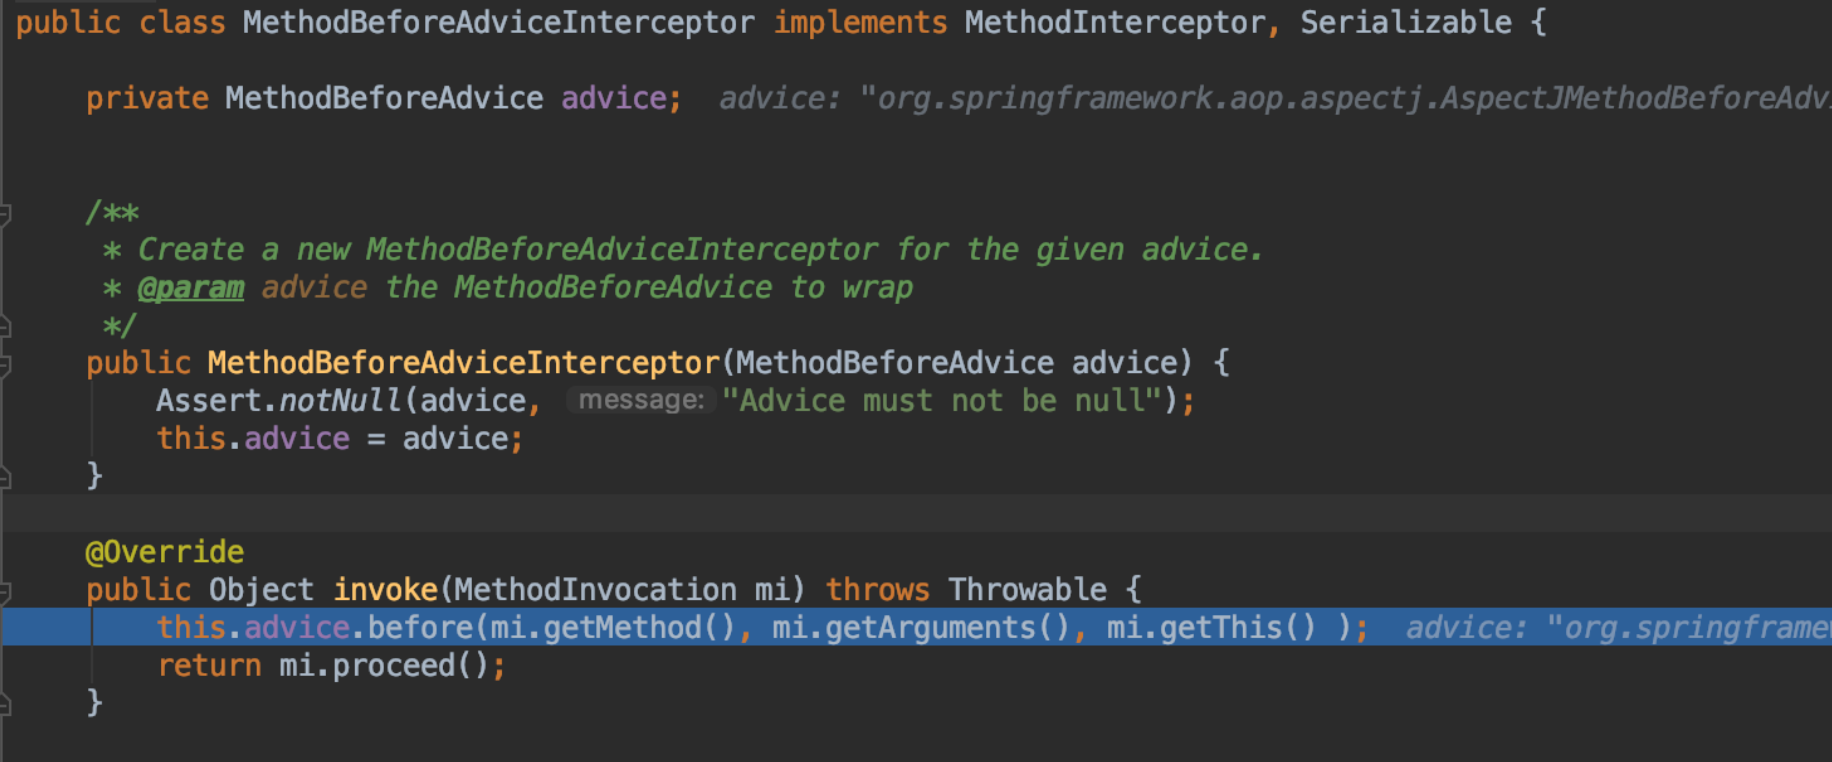
从图中我们知道,调用了MethodBeforeAdvice.before()方法,MethodBeforeAdvice持有aspectJAdviceMethod属性,这个aspectJAdviceMethod其实就TimeFeeAspect.doTimeFeeIntercepter()方法,所以before方法会进去我们定义的Aspect切面,从而实现了切入方法的功能
spring aop 关键词
现在我们走了一遍spring aop生成代理类的逻辑和代码实现方式,感觉门清了。但千万不要忽略时间老人的魔力,不久的以后你可能没有这么清晰的记忆了,一些点可能已经忘记了。这个时候关键词会给你指引和作为回忆的钥匙
spring aop 关键词
- AdvisedSupport
1
2
31. Base class for AOP proxy configuration managers
2. ProxyConfig的子类,又是ProxyFactory的父类
3. 包含Advisor,而advisor又包含advice
2.AbstractAutoProxyCreator1
2
31. 前后置方法生成代理类逻辑
2. postProcessBeforeInstantiation()
3. postProcessAfterInitialization()
3.InstantiationModelAwarePointcutAdvisor1
2
3看名字知道他是一个advisor,是它携带者pointcut和advice,从abstractAutoProxyCreater的后置方法传递给到ProxyFacatory,再传递到CglibMethodInvocation中
1. 包含pointcut(expression)
2. 包含advice:TimeFeeAspect.doTimeFeeIntercepter
MethodInterceptor内部类DynamicAdvisedInterceptor
1
DynamicAdvisedInterceptor是interceptor责任链模式的开始处。代理类把它切入到真实对象方法前后,执行切入功能
MethodBeforeAdvice
扩展 - jvm内存中生成的代理类class字节码输出到硬盘.class文件
以下两种方法的代码放在main方法中
方法一
1 | 该设置用于输出cglib动态代理产生的类 |
方法二
writeProxyClass2File("/Users/xx/skyler/project/mytest/java_example/target/classes/com/yy/example/pattern_mode/structure/proxy/dynamic_proxy/spring_aop/$Proxy2.class");

/**
  * 将内存中的$ProxyX对象生成$ProxyX.class文件存放到指定的硬盘位置
  *
  * @param outPath 存放到的硬盘位置
  */
public static void writeProxyClass2File(String outPath) {
    byte[] bytes = ProxyGenerator.generateProxyClass("$Proxy2", new Class[]{House.class});
    try (OutputStream outputStream = new FileOutputStream(new File(outPath))) {
        outputStream.write(bytes);
        outputStream.flush();
    } catch (FileNotFoundException e) {
        e.printStackTrace();
    } catch (IOException e) {
        e.printStackTrace();
    }
}

